The 10-Step Re-Roofing Process of Ajax Gregson Tiles and Its BenefitsJune 14, 2022
If you have been wondering how Ajax Gregson Tiles perform their re-roofing process and how they make sure that it is performed extremely efficient and done right the first time, here is an overview of the 10-step re-roofing process of Ajax Gregson tiles as well as its benefits.
- Installation of Guardrail
First things first, safety must be put in place. Like any other complex work, safety must be a priority. And re-roofing process is no different, it must also adhere to such protocol as an initial step. So, before commencing with the re-roofing process, a guardrail must be installed together with the ladder for safe access to the roof.
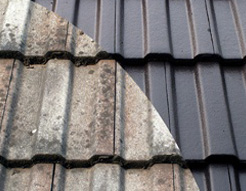
- Removal of Ridge and Old Roof Tiles
After the guardrail installation is done and already inspected for safety, the second step to take would be the removal of the ridge and old tiles from the roof to prepare it for the next steps. The entire roof must be cleared from the old roof tiles and metal sheets for easy inspection of the roof timbers.
- Inspection of the Roof Timbers
The third step is the inspection of roof timbers. This is one of the important steps that should not be neglected. It plays a vital role in ensuring that the roof is still in good structural condition and there are no signs of broken timber components because these can serve as a warning sign that the structure of the roof is probably deteriorating.
- Installation of Sarking
After ensuring that the roof structure is still in good structural condition, we now proceed to sarking installation underneath the roof. Installation of sarking involves two stages. Sarking installation as the initial stage, though not compulsory, is essentially recommended to protect your home from extreme weather.
- Installation of New Battens
This is one of the two stages of sarking installation, which is an equally important step of the re-roofing process.The laying of battensstage is done to offer a layer of air between the sarking and the roof, and as a result, provides enough insulation and ventilation.
- Sending Up of New Roof Tiles Through a Conveyor System
When the sarking and battens are already installed, it is now the time to load up the new tiles to the conveyor system or an elevator belt to be sent up to the roof for the commencement of the tile installation process.
- Laying of New Tiles and Securing Them
Now, the laying of new tiles secured by nails and clips, starting from the gutter line up to the top in a sequential manner.
- Installation of Ridge Tiles
The next process is the installation of ridge tiles to seal the top of the roof by spreading a bead of mortar on the end and along each side of the newly installed ridge and in line with the edges of a tile.
- Pointing
Second to the last of the re-roofing process of Ajax Gregson Tiles is the pointing. Pointing is a coloured mechanical fastener to keep the ridge in place and covers the mortar to match the roof tile.
- Finishing
The final step of the re-roofing process is the cleaning of the site and removal of the guard rail.
If you are looking for a reliable re-roofing specialist that you can trust when it comes to your roofing needs, call us at Ajax Gregson Tiles and our professional re-roofing specialists will be happy to assist you.
Ajax Gregson TIles
PO BOX 79, MOUNT EVELYN VIC 3796 ( Temporary )
Phone:
Glen’s Mobile 0419 546 699
Mel’s Mobile 0403 486 772
Email: ajaxtiles@bigpond.com.au
Optimized by NetwizardSEO.com.au
Recent posts
- Melbourne's Trusted Roof Tile Repair Specialists: Restoring Rooftop Elegance
- Free Roof Inspections: A Legitimate Service or a Marketing Ploy?
- Concrete Roof Tiles: How Innovation Has Improved an Age-Old Product
- The Comeback of French Terracotta Roof Tiles in Contemporary Buildings
- Tile Roofing Installation for Maximum Bushfire Protection: Expert Tips
- Roof Tile Repainting: Achieve a Stunning New Look with Ajax Gregson Roofing
- Roof Tile Colours by Ajax Gregson Tiles' Colour Studio
- Residential Roof Tile Supplier: Ajax Gregson is Your Partner for Reliable Roofing Solutions
- Tile Re-roofing Experts: What to Expect from Ajax Gregson Roofing
- Tile Roofing Installation by Ajax Gregson: Superior Protection Against Harsh Weather Conditions
- Tile Roofing Solutions Made Easy: Connect with Ajax Gregson Roofing
- Tile Roof Lifespan: Debunking Myths and Setting Realistic Expectations
- Tile Roofing Specialists: Hire Ajax Gregson for All Your Roofing Needs
Posts 2023
- Roof Tile Installation from Ajax Gregson Tiles: Perfect for Summer Renovation Projects
- Linea Tile Roofing: Stylish Design Options for Melbourne Homes
- View all articles…
Posts 2022
- Benbefits of New Tile Roof Installation You Don't Want to Miss
- Roofing Products: The Beauty Praised by Roofing Contractors
- View all articles…
Posts 2021
- The Benefits of Using Flexi Point Paint for Your Roofing Needs
- Five Reasons Why You Should Never Delay Your Reroofing Project
- View all articles…
Posts 2020
- Colour Studio: How to Choose the Right Roof Colour for Overall Home Appeal
- How to Keep Your Concrete Roofing Algae and Mould-Free
- View all articles…
Posts 2019
- Linea Concrete Roof Tiles: A Cost-Effective Alternative for the Traditional Slate Shingles
- Terracotta Roof Tiles: External Colours that Complement Your Melbourne Home's Overall Design
- View all articles…
Posts 2018
- Slimline Designs: Why Opt to Choose It for Your Roof?
- Why Do Tile Roofs Fail? What are the Best Remedies?
- View all articles…
Posts 2017
- The Right Roofing Material is A Vital Part of Your Home Extension
- How Well Do Terracotta Roof Tiles Respond to Different Weather Conditions?
- View all articles…
Posts 2016
- Are Concrete Roof Tiles Fireproof?
- Why Should You Consider Using Roof Tiles than Asphalt Shingles?
- View all articles…
Posts 2015
- Re-roofing Advantages and When Should You Get Rid Of Your Old Roof Tiles?
- Differences between Tile Roofs and Shingle Roofs: Reasons Why Tile Roofs Are Better
- View all articles…